Call +(254) 703 030 000 / 751 483 999 / 721 704 777
Trailer Electrical & Braking
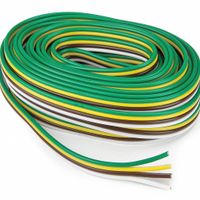
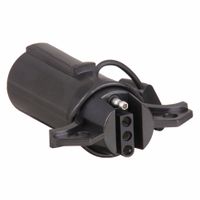
Trailer electrical wiring and harness plugs replace worn parts in vehicle electrical connections. The most basic design is the color-coded 4-pin system that uses a brown wire for tail, license, and side marker lights, yellow wire for left hand stop and turn, green wire for right hand stop and turn, .....Read More
Frequently Asked Questions
What are the color codes for a 4-pin trailer wiring harness?
The color codes for a 4-pin trailer wiring harness are as follows:
1. **White Wire**: This is the ground wire. It connects the trailer frame to the vehicle frame to ensure a proper ground connection. It is crucial for the electrical system to function correctly.
2. **Brown Wire**: This wire is used for the tail lights and side marker lights. It provides power to the trailer's running lights, which are necessary for visibility at night or in low-light conditions.
3. **Yellow Wire**: This wire is designated for the left turn signal and left brake light. It synchronizes the trailer's left-side lights with the vehicle's left turn signal and brake light functions.
4. **Green Wire**: This wire is used for the right turn signal and right brake light. It ensures that the trailer's right-side lights operate in conjunction with the vehicle's right turn signal and brake light functions.
These color codes are standardized for 4-pin trailer wiring harnesses, ensuring compatibility and ease of installation across different vehicles and trailers.
How do I replace a worn trailer wiring harness?
1. **Gather Tools and Materials**: Obtain a new wiring harness compatible with your trailer, wire cutters, wire strippers, electrical tape, connectors, a screwdriver, and a multimeter.
2. **Safety First**: Disconnect the trailer from the towing vehicle and ensure the trailer is on a stable surface. Disconnect the trailer's battery if applicable.
3. **Remove the Old Harness**: Locate the trailer's wiring harness, usually running along the frame. Use wire cutters to carefully cut and remove the old harness, noting the routing and attachment points.
4. **Inspect and Clean**: Check the trailer's wiring path for any damage or corrosion. Clean the connectors and attachment points to ensure a good connection with the new harness.
5. **Install the New Harness**: Begin by routing the new harness along the same path as the old one. Secure it with clips or zip ties to prevent movement.
6. **Connect the Wires**: Match the wires of the new harness to the trailer's existing wires by color and function (e.g., brake lights, turn signals). Use wire strippers to expose the wire ends, then connect them using appropriate connectors (e.g., butt connectors, crimp connectors).
7. **Secure Connections**: Wrap each connection with electrical tape to protect against moisture and ensure a secure fit.
8. **Test the System**: Reconnect the trailer to the towing vehicle. Use a multimeter or a test light to check each function (e.g., brake lights, turn signals) to ensure proper operation.
9. **Final Adjustments**: Make any necessary adjustments to the wiring or connections. Ensure all wires are secured and not exposed to potential damage.
10. **Reattach and Test**: Reattach the trailer to the towing vehicle and perform a final test of all lights and signals to confirm everything is working correctly.
What is the difference between a 6-pin and 7-pin trailer connector?
A 6-pin trailer connector typically includes connections for the following functions: ground, tail/running lights, left turn/brake light, right turn/brake light, electric brake, and auxiliary power. This setup is commonly used for smaller trailers that require basic lighting and braking functions.
A 7-pin trailer connector, on the other hand, includes all the functions of a 6-pin connector but adds an additional pin for reverse lights or another auxiliary function. The 7-pin configuration is more versatile and is often used for larger trailers, such as RVs or those with additional features like backup lights or a battery charge line.
The main difference lies in the additional pin of the 7-pin connector, which provides more functionality and flexibility for towing needs.
How do I troubleshoot trailer wiring issues?
1. **Visual Inspection**: Check for visible damage such as frayed wires, corrosion, or loose connections. Ensure the trailer plug and vehicle socket are clean and free of debris.
2. **Test the Vehicle Connector**: Use a multimeter or a test light to verify that the vehicle's connector is supplying power. Check each pin for the correct voltage when the corresponding vehicle function (e.g., brake, turn signal) is activated.
3. **Check Ground Connections**: Ensure that both the vehicle and trailer have solid ground connections. A poor ground can cause various electrical issues. Clean and tighten any corroded or loose ground wires.
4. **Inspect Fuses and Relays**: Check the vehicle's fuse box for any blown fuses related to the trailer wiring. Replace any faulty fuses and test the system again.
5. **Test Trailer Wiring**: Connect the trailer to the vehicle and use a multimeter or test light to check for power at the trailer's lights. If a specific light isn't working, trace the wire back to find any breaks or damage.
6. **Check Bulbs and Sockets**: Ensure all bulbs are functional and properly seated in their sockets. Replace any burnt-out bulbs and clean any corroded sockets.
7. **Examine the Wiring Harness**: Look for any pinched, cut, or damaged wires along the trailer's wiring harness. Repair or replace any damaged sections.
8. **Use a Trailer Wiring Tester**: If available, use a trailer wiring tester to diagnose issues. This tool can help identify problems with specific circuits.
9. **Consult a Professional**: If the issue persists after these steps, consider consulting a professional mechanic or electrician for further diagnosis and repair.
What tools are needed to replace trailer wiring harness plugs?
To replace trailer wiring harness plugs, you will need the following tools:
1. **Wire Strippers/Cutters**: Essential for stripping the insulation off the wires and cutting them to the desired length.
2. **Crimping Tool**: Used to securely attach connectors to the wires. A good crimping tool ensures a solid connection that can withstand vibrations and weather conditions.
3. **Multimeter**: Useful for testing the electrical connections and ensuring that the wiring is functioning correctly before and after replacement.
4. **Screwdrivers**: Depending on the trailer, you may need flathead or Phillips screwdrivers to remove any panels or covers that protect the wiring.
5. **Heat Gun**: Used to shrink heat shrink tubing over connections, providing insulation and protection against moisture.
6. **Soldering Iron and Solder**: While not always necessary, soldering can provide a more secure and durable connection than crimping alone.
7. **Heat Shrink Tubing**: Provides insulation and protection for the wire connections. It is applied over the connection and shrunk using a heat gun.
8. **Electrical Tape**: Used for additional insulation and to secure wires together.
9. **Replacement Wiring Harness/Plugs**: Ensure you have the correct replacement parts that match your trailer's specifications.
10. **Pliers**: Useful for holding wires and connectors in place while working.
11. **Utility Knife**: For cutting through any protective sheathing or tape.
12. **Wire Connectors**: Such as butt connectors or quick splice connectors, to join wires securely.
13. **Flashlight or Work Light**: Provides visibility in low-light conditions, ensuring accuracy and safety.
14. **Protective Gloves**: To protect your hands from sharp wires and tools.
15. **Safety Glasses**: To protect your eyes from debris and sparks, especially when cutting or soldering wires.
How do I wire a 7-pin trailer connector?
To wire a 7-pin trailer connector, follow these steps:
1. **Gather Materials**: You'll need a 7-pin trailer connector, wire strippers, crimping tool, electrical tape, and appropriate gauge wires.
2. **Identify Wires**: The 7-pin connector typically includes the following:
- **Pin 1 (White)**: Ground
- **Pin 2 (Blue)**: Electric brakes
- **Pin 3 (Green)**: Tail/Running lights
- **Pin 4 (Black)**: Battery charge/12V power
- **Pin 5 (Red)**: Left turn signal/Brake lights
- **Pin 6 (Brown)**: Right turn signal/Brake lights
- **Pin 7 (Yellow)**: Reverse lights
3. **Prepare Wires**: Strip about 1/4 inch of insulation from the end of each wire.
4. **Connect Wires**:
- Attach each wire to its corresponding pin on the connector.
- Use a crimping tool to secure the wires to the pins.
- Ensure each wire is connected to the correct pin based on the color code.
5. **Secure Connections**:
- Use electrical tape or heat shrink tubing to insulate and protect the connections.
- Ensure there are no exposed wires that could cause a short circuit.
6. **Test the Connection**:
- Connect the trailer to the towing vehicle.
- Test each function (brakes, turn signals, running lights, etc.) to ensure they work correctly.
7. **Final Check**:
- Double-check all connections for tightness and security.
- Ensure the connector is mounted securely to prevent damage during use.
By following these steps, you can wire a 7-pin trailer connector effectively.
Can I convert a 4-pin trailer connector to a 7-pin connector?
Yes, you can convert a 4-pin trailer connector to a 7-pin connector. To do this, you will need a 7-pin trailer connector kit, which typically includes the 7-pin connector, wiring, and sometimes a mounting bracket. Here’s a step-by-step guide:
1. **Gather Materials**: Obtain a 7-pin connector kit, wire strippers, electrical tape, a circuit tester, and possibly a drill for mounting.
2. **Understand Wiring Functions**: The 4-pin connector typically handles basic lighting functions: ground, tail lights, left turn/brake lights, and right turn/brake lights. The 7-pin connector adds additional functions: auxiliary power, electric brakes, and reverse lights.
3. **Disconnect Battery**: For safety, disconnect the vehicle’s battery to prevent any electrical shorts.
4. **Mount the 7-Pin Connector**: Choose a suitable location on your vehicle to mount the 7-pin connector. Use a drill if necessary to secure the mounting bracket.
5. **Connect Existing Wires**: Match the existing 4-pin wires to the corresponding terminals on the 7-pin connector. Typically, the color codes are:
- White: Ground
- Brown: Tail/Running Lights
- Yellow: Left Turn/Brake
- Green: Right Turn/Brake
6. **Add Additional Wires**: For the additional functions, you may need to run new wires:
- Blue: Electric Brakes
- Black: Auxiliary Power
- Purple: Reverse Lights
7. **Secure Connections**: Use wire connectors or soldering to ensure secure connections. Wrap connections with electrical tape to protect against moisture.
8. **Test the System**: Reconnect the battery and use a circuit tester to ensure all functions work correctly.
9. **Final Check**: Ensure all wires are secured and not dangling, which could lead to damage.
By following these steps, you can successfully convert a 4-pin trailer connector to a 7-pin connector, enabling additional trailer functions.