Call +(254) 703 030 000 / 751 483 999 / 721 704 777
Warning Whips & Accessories
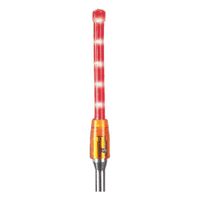
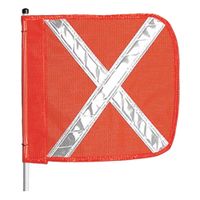
Warnings whips with either a high-visibility flag or a flag and light combination provide quick and easy identification of work vehicles and equipment. Whips are made of nylon to withstand all weather conditions. Accessories include magnetic fiberglass resin bases for mounting on vehicles, replaceme .....Read More
Frequently Asked Questions
What are warning whips used for?
Warning whips are safety devices used primarily in mining, construction, and industrial environments to enhance visibility and alertness around vehicles and equipment. They are typically long, flexible poles mounted on vehicles, often with a brightly colored flag or light at the top. The primary purpose of warning whips is to increase the visibility of vehicles, especially in areas with limited sightlines, such as mines, quarries, or construction sites, where large equipment and vehicles operate.
In these environments, the terrain can be uneven, and dust or debris can obscure visibility. Warning whips help prevent accidents by making vehicles more noticeable to operators of other machinery and ground personnel. The height of the whip allows it to be seen over obstacles, ensuring that even if the vehicle itself is not visible, the whip is. This is particularly important for smaller vehicles that might otherwise be hidden behind larger equipment or terrain features.
Additionally, warning whips often incorporate lights, which can be flashing or steady, to further enhance visibility in low-light conditions or during night operations. The combination of bright colors and lights ensures that the vehicle is easily identifiable from a distance, reducing the risk of collisions.
In summary, warning whips are crucial for maintaining safety in environments where visibility is compromised. They serve as a visual alert system, ensuring that vehicles and equipment are easily seen, thereby preventing accidents and enhancing overall site safety.
How do you install a warning whip on a vehicle?
1. **Select the Location**: Choose a visible spot on the vehicle, typically the front or rear bumper, or the roof rack, ensuring it doesn't obstruct the driver's view.
2. **Gather Tools and Materials**: You will need a drill, drill bits, wrench, mounting bracket, bolts, nuts, and the warning whip.
3. **Prepare the Mounting Surface**: Clean the area where the whip will be installed to ensure a secure fit.
4. **Drill Holes**: Use the drill to make holes in the selected mounting location. Ensure the holes align with the mounting bracket.
5. **Attach the Mounting Bracket**: Secure the bracket using bolts and nuts. Tighten them with a wrench to ensure stability.
6. **Install the Whip**: Insert the base of the warning whip into the mounting bracket. Some whips may screw in, while others might require a pin or bolt to secure them.
7. **Check Stability**: Ensure the whip is firmly attached and does not wobble. Tighten any loose connections.
8. **Test Visibility**: Verify that the whip is visible from a distance and does not interfere with vehicle operations.
9. **Adjust as Necessary**: If the whip is not visible enough, consider using a longer whip or adjusting the mounting angle.
10. **Secure Wiring (if applicable)**: If the whip has lights, route the wiring to the vehicle's power source, securing it with zip ties. Connect to the battery or fuse box, ensuring proper insulation and grounding.
11. **Test Functionality**: If the whip is illuminated, test the lights to ensure they work correctly.
12. **Final Inspection**: Double-check all connections and the whip's stability before use.
What materials are warning whips made from?
Warning whips are typically made from a combination of materials to ensure durability, visibility, and flexibility. The main components include:
1. **Fiberglass**: The shaft of the warning whip is often made from fiberglass. This material is chosen for its strength, lightweight nature, and flexibility, allowing the whip to bend without breaking under stress or impact.
2. **Polycarbonate or Nylon**: The base or handle of the whip may be constructed from polycarbonate or nylon, providing a sturdy grip and resistance to environmental elements.
3. **High-Visibility Materials**: The whip is often coated or wrapped with high-visibility materials such as fluorescent orange or yellow vinyl. This enhances visibility during the day and in low-light conditions.
4. **Reflective Tape**: To improve visibility at night, reflective tape is often added to the whip. This tape reflects light from headlights or other sources, making the whip more noticeable in the dark.
5. **LED Lights**: Some warning whips incorporate LED lights within the shaft or at the tip. These lights can be powered by batteries and are used to increase visibility in poor lighting conditions.
6. **Weather-Resistant Coatings**: To protect against harsh weather conditions, the materials used in warning whips are often treated with weather-resistant coatings. This ensures longevity and performance in various environments.
7. **Rubber or Plastic Caps**: The tips of the whips may have rubber or plastic caps to prevent damage to the whip and to provide a safety feature by reducing the risk of injury upon contact.
These materials are selected to ensure that warning whips are effective in providing safety and visibility in industrial, mining, and off-road environments.
Can warning whips be used in all weather conditions?
Warning whips can generally be used in various weather conditions, but their effectiveness and durability may vary depending on the specific materials and design. They are typically designed to withstand harsh environments, including rain, snow, and wind, as they are often used in mining, construction, and other outdoor industries to enhance visibility and safety. However, extreme conditions such as heavy snowfall, ice accumulation, or severe storms might affect their performance. It's important to choose a warning whip made from high-quality, weather-resistant materials like fiberglass or reinforced plastics, and ensure it has a durable, waterproof light source if illumination is required. Regular maintenance and inspection are also crucial to ensure they remain functional and visible in all weather conditions.
How do you add LED lights to a warning whip?
1. **Select LED Lights**: Choose waterproof, flexible LED strip lights that match the length of your whip. Ensure they are suitable for outdoor use.
2. **Gather Materials**: You will need LED strip lights, a power source (battery pack), heat shrink tubing, electrical tape, zip ties, a soldering iron, solder, and wire cutters.
3. **Prepare the Whip**: Clean the whip to ensure the LED strips adhere properly. If the whip is opaque, consider using a translucent tube to diffuse the light.
4. **Attach LED Strips**: Peel the backing off the LED strip and carefully wrap or adhere it along the length of the whip. Use zip ties or clear adhesive to secure it in place.
5. **Connect Power Source**: Solder wires from the LED strip to the battery pack. Ensure correct polarity: positive to positive, negative to negative. Use heat shrink tubing to cover and protect the soldered connections.
6. **Secure Wiring**: Run the wires along the whip, securing them with electrical tape or zip ties. Ensure the wiring is tight and does not dangle.
7. **Test the Setup**: Before finalizing, test the LED lights to ensure they illuminate properly. Check connections if there are issues.
8. **Weatherproofing**: Use electrical tape or silicone sealant to cover any exposed connections, ensuring the setup is weatherproof.
9. **Mount the Whip**: Attach the whip to your vehicle or desired location. Ensure the battery pack is accessible for easy replacement or recharging.
10. **Safety Check**: Ensure all components are securely attached and do not interfere with the whip’s flexibility or function.
This setup will enhance visibility and safety while adding a custom look to your warning whip.
What are the benefits of using a high-visibility flag on a warning whip?
A high-visibility flag on a warning whip offers several benefits:
1. **Enhanced Visibility**: The bright colors and reflective materials of high-visibility flags make them easily noticeable from a distance, even in low-light conditions. This is crucial for safety in environments like construction sites, mines, or off-road areas where vehicles and equipment operate.
2. **Accident Prevention**: By making vehicles and equipment more visible, high-visibility flags help prevent collisions and accidents. They alert other operators and pedestrians to the presence of a vehicle, reducing the risk of injury or damage.
3. **Compliance with Safety Regulations**: Many industries have safety regulations that require the use of high-visibility equipment. Using a high-visibility flag ensures compliance with these standards, avoiding potential fines or legal issues.
4. **Durability**: High-visibility flags are often made from durable materials that withstand harsh weather conditions, UV exposure, and physical wear and tear. This longevity ensures consistent performance and reduces the need for frequent replacements.
5. **Cost-Effectiveness**: By preventing accidents and ensuring compliance with safety regulations, high-visibility flags can save companies money in the long run. They reduce the likelihood of costly repairs, medical expenses, and legal fees.
6. **Versatility**: These flags can be used in various settings, including construction sites, agricultural fields, and recreational areas. Their adaptability makes them a practical safety solution across different industries.
7. **Psychological Impact**: The presence of high-visibility flags can create a heightened sense of awareness among workers and operators, promoting a culture of safety and vigilance.
Overall, high-visibility flags on warning whips are a simple yet effective tool for enhancing safety and operational efficiency in various environments.
Are there different mounting options for warning whips?
Yes, there are different mounting options for warning whips, each designed to suit various vehicles and operational needs. Common mounting options include:
1. **Magnetic Mounts**: These are easy to install and remove, making them ideal for temporary use. They use strong magnets to attach the whip to metal surfaces, providing flexibility in positioning.
2. **Bolt-On Mounts**: These mounts offer a more permanent solution by bolting the whip directly onto the vehicle. They are suitable for vehicles that require a stable and secure attachment, such as construction or mining equipment.
3. **Spring Mounts**: Designed to absorb shock and vibration, spring mounts are ideal for vehicles operating in rough terrains. They help prevent damage to the whip by allowing it to flex and bend.
4. **Quick-Release Mounts**: These allow for fast installation and removal of the whip, which is useful for vehicles that frequently enter areas where whips are not needed or allowed.
5. **Pipe Mounts**: These are used to attach the whip to existing pipes or poles on the vehicle, providing a versatile mounting option that can be adjusted for height and angle.
6. **Magnetic Base with Suction Cup**: Combining magnetic and suction cup technology, this mount provides a strong hold on non-metallic surfaces, offering versatility in mounting locations.
7. **Clamp Mounts**: These use clamps to attach the whip to various parts of the vehicle, such as roof racks or roll bars, providing a secure and adjustable option.
Each mounting option has its advantages and is chosen based on the specific requirements of the vehicle, the environment, and the frequency of use.