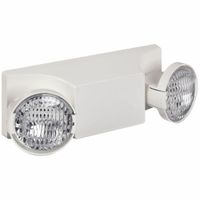
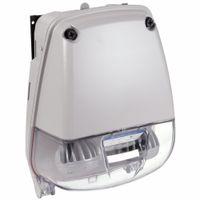
Emergency Light Fixtures

Emergency light fixtures automatically switch on when power goes out and illuminate pathways toward exits. They can stay lit for at least 90 minutes to guide evacuations and allow first responders and maintenance staff to find their way when working within buildings during an outage. Also known as e .....Read More

Frequently Asked Questions

What are emergency light fixtures and how do they work?

Emergency light fixtures are devices designed to provide illumination during power outages or emergencies, ensuring safety and visibility. They are crucial in commercial, industrial, and residential buildings to guide occupants to exits and prevent accidents. These fixtures typically consist of a light source, a battery, a charging circuit, and a control unit. The light source is often LED due to its energy efficiency and long lifespan. The battery, usually a rechargeable type like Ni-Cd or Li-ion, powers the light during an outage. The charging circuit keeps the battery charged during normal power conditions, while the control unit manages the transition between normal and emergency modes. Emergency lights operate in two main modes: maintained and non-maintained. Maintained lights are always on, serving as regular lighting and switching to battery power during an outage. Non-maintained lights remain off and activate only when the main power fails. The system is connected to the building's electrical supply. Under normal conditions, the battery charges continuously. When a power failure occurs, the control unit detects the loss of power and automatically switches the light source to battery power, illuminating the area. Once power is restored, the system reverts to charging mode, preparing for future outages. Emergency light fixtures are strategically placed along escape routes, stairwells, and exits to ensure safe evacuation. Regular testing and maintenance are essential to ensure their reliability, involving periodic checks of battery health and light functionality. Compliance with local safety regulations and standards is crucial for effective emergency lighting systems.

How long do emergency lights stay on during a power outage?

Emergency lights typically stay on for about 90 minutes during a power outage. This duration is based on standard regulations and requirements set by safety codes, such as the National Fire Protection Association (NFPA) in the United States. The 90-minute timeframe is designed to provide sufficient illumination for safe evacuation of a building in the event of an emergency. Emergency lighting systems are equipped with rechargeable batteries that automatically activate when the main power supply is interrupted. These batteries are usually designed to provide full brightness for the entire duration of the 90 minutes. However, the actual time can vary depending on factors such as the age and condition of the battery, the type of emergency lighting system, and the specific requirements of the building or local regulations. In some cases, emergency lighting systems may be designed to last longer than 90 minutes, especially in larger buildings or facilities with complex evacuation routes. It's important for building owners and facility managers to regularly test and maintain their emergency lighting systems to ensure they function properly during an outage. This includes routine checks of the battery condition, light output, and overall system performance. Ultimately, the goal of emergency lighting is to ensure that occupants can safely exit a building during a power failure, and the 90-minute standard is generally considered adequate for this purpose.

What are the installation requirements for emergency lights?

The installation requirements for emergency lights typically include the following: 1. **Compliance with Codes and Standards**: Ensure compliance with local building codes, fire safety regulations, and standards such as NFPA 101 (Life Safety Code) and OSHA requirements. 2. **Location and Placement**: Install emergency lights at strategic locations, including exits, stairways, corridors, and any point where a change in direction occurs. They should illuminate escape routes and be visible from any point in the area. 3. **Mounting Height**: Mount emergency lights at a height that ensures optimal illumination, typically between 6 to 8 feet above the floor. 4. **Illumination Levels**: Ensure that emergency lights provide at least 1 foot-candle (10.8 lux) of illumination on the floor along the path of egress. 5. **Power Supply**: Emergency lights must have a reliable power source, typically a battery backup that can provide at least 90 minutes of illumination during a power outage. 6. **Testing and Maintenance**: Regularly test emergency lights to ensure they function correctly. Monthly and annual testing is often required, with records kept for inspection. 7. **Durability and Protection**: Use fixtures that are durable and suitable for the environment, including weatherproof models for outdoor use. 8. **Signage**: Combine emergency lights with exit signs where necessary to clearly indicate the direction of egress. 9. **Installation by Qualified Personnel**: Ensure that installation is performed by qualified electricians or professionals familiar with emergency lighting systems. 10. **Integration with Fire Alarm Systems**: In some cases, integrate emergency lighting with fire alarm systems for automatic activation during emergencies. These requirements ensure that emergency lighting systems are effective in providing safe egress during power failures or emergencies.

How often should emergency lights be tested?

Emergency lights should be tested regularly to ensure they function correctly during a power outage or emergency situation. The frequency of testing can vary based on local regulations, industry standards, and manufacturer recommendations, but generally follows these guidelines: 1. **Monthly Testing**: Conduct a quick functional test every month. This involves simulating a power failure to ensure that the emergency lights turn on and remain illuminated. The test should last for at least 30 seconds. This helps identify any immediate issues with the lights or their power sources. 2. **Annual Testing**: Perform a more comprehensive test annually. This involves a full discharge test where the emergency lights are operated on battery power for the full duration specified by the manufacturer, typically 90 minutes. This ensures that the battery can sustain the lights for the required time during an actual emergency. 3. **Visual Inspections**: Regular visual inspections should be conducted to check for any physical damage, obstructions, or dirt that might affect the performance of the emergency lights. This can be done in conjunction with monthly tests. 4. **Record Keeping**: Maintain detailed records of all tests and inspections. This documentation should include the date of the test, the results, any maintenance performed, and the name of the person conducting the test. This is important for compliance with safety regulations and for tracking the performance and maintenance history of the emergency lighting system. 5. **Compliance with Regulations**: Always adhere to local fire codes, building regulations, and industry standards, such as those set by the National Fire Protection Association (NFPA) or the Occupational Safety and Health Administration (OSHA), which may have specific requirements for testing frequency and procedures. Regular testing and maintenance of emergency lights are crucial for ensuring safety and compliance with legal requirements.

What is the difference between general purpose and wet location emergency lights?

General purpose emergency lights and wet location emergency lights are designed for different environmental conditions and applications. General purpose emergency lights are intended for indoor use in areas that are not exposed to moisture, water, or harsh environmental conditions. They are typically installed in offices, schools, retail spaces, and other indoor environments where the primary concern is providing illumination during power outages. These lights are not sealed against moisture and may not have the necessary protection to withstand exposure to water or extreme weather conditions. Wet location emergency lights, on the other hand, are specifically designed to operate in environments where they may be exposed to moisture, rain, or direct water contact. These lights are suitable for outdoor use or in areas with high humidity, such as parking garages, industrial facilities, or near swimming pools. They are constructed with materials and seals that prevent water ingress, ensuring reliable operation even in wet conditions. Wet location lights often have a higher IP (Ingress Protection) rating, indicating their resistance to water and dust. In summary, the key difference lies in their intended use and construction: general purpose emergency lights are for dry, indoor environments, while wet location emergency lights are built to withstand moisture and are suitable for outdoor or damp areas.

How do you maintain and replace the batteries in emergency lights?

To maintain and replace the batteries in emergency lights, follow these steps: 1. **Regular Inspection**: Check emergency lights monthly to ensure they are functioning properly. Look for any signs of damage or corrosion on the battery terminals. 2. **Testing**: Conduct a functional test by simulating a power outage. This involves turning off the main power supply to see if the emergency lights activate. They should remain illuminated for at least 30 minutes. 3. **Cleaning**: Clean the battery terminals and contacts using a mixture of baking soda and water to remove any corrosion. Use a soft brush or cloth for this purpose. 4. **Battery Replacement**: - **Identify Battery Type**: Determine the type of battery used (e.g., NiCd, NiMH, or lead-acid) and its specifications. - **Power Off**: Ensure the power supply to the emergency light is turned off before replacing the battery. - **Remove Old Battery**: Carefully disconnect and remove the old battery, noting the orientation of the terminals. - **Install New Battery**: Insert the new battery, ensuring correct polarity. Secure it in place and reconnect the terminals. 5. **Charging**: Allow the new battery to charge fully. This may take up to 24 hours, depending on the battery type and capacity. 6. **Documentation**: Record the date of battery replacement and any maintenance performed. This helps in tracking the battery life and scheduling future maintenance. 7. **Disposal**: Dispose of old batteries according to local regulations, as they contain hazardous materials. 8. **Professional Assistance**: If unsure about any step, consult a professional electrician to ensure safety and compliance with local codes. Regular maintenance and timely replacement of batteries ensure that emergency lights function effectively during power outages, providing safety and compliance with safety regulations.

What are the local safety codes for emergency lighting installation?

Local safety codes for emergency lighting installation can vary by region, but generally, they align with national standards such as the National Fire Protection Association (NFPA) codes in the United States or the British Standards (BS) in the UK. Key elements typically include: 1. **Code Compliance**: Ensure compliance with NFPA 101 (Life Safety Code) or BS 5266, which provide guidelines on emergency lighting requirements. 2. **Illumination Levels**: Emergency lighting must provide a minimum illumination level, often around 1 foot-candle (10.8 lux) at floor level in the US, or 1 lux in the UK, to ensure visibility during an evacuation. 3. **Duration**: Emergency lighting systems should operate for at least 90 minutes after a power failure, as per NFPA standards, or 3 hours according to BS 5266. 4. **Placement**: Install lights at exits, stairways, corridors, and any other egress paths. They should be positioned to avoid shadows and ensure clear visibility. 5. **Testing and Maintenance**: Regular testing is required, typically monthly for functional tests and annually for full-duration tests, to ensure reliability. 6. **Signage**: Exit signs must be illuminated and clearly visible, with specific color and size requirements as per local codes. 7. **Backup Power**: Emergency lighting must be connected to a reliable backup power source, such as batteries or generators, to ensure functionality during outages. 8. **Installation Standards**: Follow local electrical codes for installation, which may include specific wiring and circuit requirements to prevent failure. 9. **Documentation**: Maintain records of installation, testing, and maintenance activities for inspection by local authorities. Consult local building codes and fire safety regulations for specific requirements in your area, as they may have additional stipulations or variations.