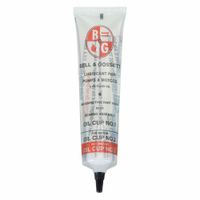
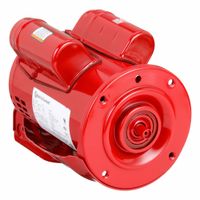
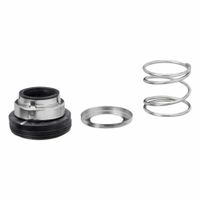
Repair Parts & Kits for Circulating Pumps

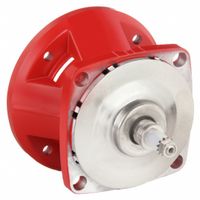
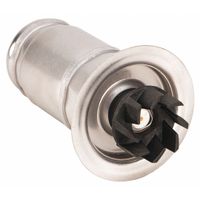
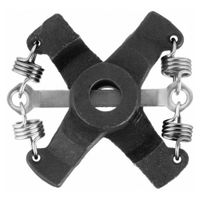
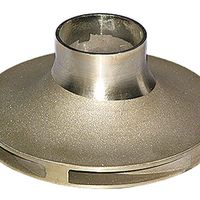
These repair parts and kits maintain circulating pumps. Bearing assemblies transfer the power generated by the motor to the impeller. Motors run on alternating current (AC) to power the pump. The bearing assembly and motor are replaceable in a 3-piece circulating pump. Impellers are the rotating mec .....Read More

Frequently Asked Questions

What are the common signs that a circulating pump needs repair or replacement?

Common signs that a circulating pump needs repair or replacement include: 1. **Unusual Noises**: Grinding, whining, or banging sounds can indicate worn-out bearings or other internal issues. 2. **Leaking**: Visible water leaks around the pump or from the seals suggest a need for repair or replacement. 3. **Inconsistent Heating**: Uneven heating or cooling in the system may point to a failing pump that cannot circulate fluid effectively. 4. **No Power**: If the pump does not turn on, it could be due to electrical issues, a faulty motor, or a blown fuse. 5. **Overheating**: A pump that becomes excessively hot may have a motor problem or be working harder than it should due to blockages. 6. **Vibration**: Excessive vibration can indicate misalignment, worn bearings, or an unbalanced impeller. 7. **Low Pressure**: Reduced water pressure or flow can be a sign of a failing pump that cannot maintain adequate circulation. 8. **Frequent Cycling**: A pump that turns on and off more frequently than usual may have a pressure switch issue or be undersized for the system. 9. **Age**: Pumps nearing the end of their expected lifespan (usually 10-15 years) may need replacement due to wear and tear. 10. **Increased Energy Bills**: A sudden rise in energy costs can indicate a pump that is working inefficiently or running continuously. 11. **Corrosion**: Visible rust or corrosion on the pump body can compromise its structural integrity and performance. 12. **Air in System**: Air bubbles or noise in the system can suggest a pump that is not sealing properly or has a failing impeller. Addressing these signs promptly can prevent further damage and ensure the efficient operation of the heating or cooling system.

How do I choose the right bearing assembly for my circulating pump?

To choose the right bearing assembly for your circulating pump, consider the following factors: 1. **Load Capacity**: Determine the radial and axial loads the bearing will encounter. Choose a bearing that can handle these loads without excessive wear. 2. **Speed Requirements**: Check the operating speed of the pump. Bearings are rated for specific speed limits, so ensure the selected bearing can operate efficiently at your pump's speed. 3. **Temperature Range**: Consider the operating temperature of the pump environment. Bearings must withstand the temperature without degrading. High-temperature applications may require special materials or lubricants. 4. **Lubrication**: Decide between grease-lubricated or oil-lubricated bearings based on maintenance capabilities and operating conditions. Proper lubrication reduces friction and wear. 5. **Material Compatibility**: Ensure the bearing material is compatible with the pump's fluid to prevent corrosion or degradation. Stainless steel or ceramic bearings may be necessary for corrosive environments. 6. **Alignment and Misalignment**: Consider the potential for misalignment in the pump assembly. Self-aligning bearings can accommodate some misalignment, reducing stress on the bearing. 7. **Vibration and Noise**: If noise and vibration are concerns, select bearings designed to minimize these factors, such as precision-grade or low-noise bearings. 8. **Maintenance and Accessibility**: Evaluate the ease of maintenance and replacement. Some bearings require more frequent maintenance, while others are designed for longer service intervals. 9. **Cost and Availability**: Balance the cost of the bearing with its performance and availability. High-quality bearings may have a higher upfront cost but offer longer service life and reliability. 10. **Manufacturer Recommendations**: Consult the pump manufacturer’s specifications and recommendations for bearing types and sizes to ensure compatibility and optimal performance.

What is the process for replacing a motor in a 3-piece circulating pump?

1. **Safety First**: Disconnect the power supply to the pump to ensure safety. Lock out and tag out the power source to prevent accidental activation. 2. **Drain the System**: Close the valves on either side of the pump to isolate it from the system. Drain the pump and surrounding pipes to prevent water spillage. 3. **Remove the Pump**: Loosen and remove the bolts or screws securing the pump to the piping system. Carefully detach the pump from the pipes. 4. **Disassemble the Pump**: Place the pump on a stable work surface. Remove the bolts or screws holding the pump casing together. Separate the pump into its three main components: the motor, the impeller, and the volute. 5. **Detach the Motor**: Disconnect the electrical connections from the motor. Remove the bolts or screws securing the motor to the pump assembly. Carefully lift the motor away from the pump. 6. **Install the New Motor**: Position the new motor in place of the old one. Secure it with bolts or screws. Reconnect the electrical connections, ensuring they are tight and secure. 7. **Reassemble the Pump**: Align the impeller and volute with the new motor. Reattach the pump casing, ensuring all bolts or screws are tightened evenly to prevent leaks. 8. **Reinstall the Pump**: Position the pump back into the piping system. Secure it with bolts or screws. Open the valves to allow water to flow back into the pump. 9. **Test the Pump**: Restore power to the pump. Turn it on and check for proper operation. Inspect for leaks and ensure the pump is circulating water effectively. 10. **Final Checks**: Monitor the pump for a short period to ensure it is functioning correctly and there are no unusual noises or vibrations.

How do I determine the correct impeller size for my pump?

To determine the correct impeller size for your pump, follow these steps: 1. **Identify System Requirements**: Determine the flow rate (Q) and total dynamic head (TDH) required for your application. These are critical parameters that dictate the pump's performance. 2. **Pump Curve Analysis**: Obtain the pump performance curve from the manufacturer. This curve shows the relationship between flow rate, head, and impeller diameter. It helps in selecting an impeller size that meets your system's flow and head requirements. 3. **Calculate Specific Speed (Ns)**: Use the formula Ns = (N * √Q) / (H^0.75), where N is the pump speed in RPM, Q is the flow rate in GPM, and H is the head in feet. This helps in understanding the pump's operational efficiency and suitability for your application. 4. **Efficiency Consideration**: Choose an impeller size that operates near the pump's Best Efficiency Point (BEP) on the curve. Operating at or near the BEP ensures optimal energy use and reduces wear and tear. 5. **Check NPSH Requirements**: Ensure the Net Positive Suction Head Available (NPSHa) in your system exceeds the Net Positive Suction Head Required (NPSHr) by the pump. This prevents cavitation and ensures smooth operation. 6. **Material and Design Constraints**: Consider the material compatibility and design constraints of the impeller with the fluid being pumped. This includes checking for corrosion resistance and mechanical strength. 7. **Consult Manufacturer or Engineer**: If unsure, consult with the pump manufacturer or a qualified engineer. They can provide insights based on empirical data and experience. 8. **Iterative Testing**: Sometimes, iterative testing and adjustments are necessary to fine-tune the impeller size for optimal performance in real-world conditions. By following these steps, you can select the correct impeller size that ensures efficient and reliable pump operation.

What are the steps to install a seal kit or gasket in a circulating pump?

1. **Safety First**: Turn off the power supply to the pump and close the valves on both the suction and discharge sides to prevent water flow. 2. **Drain the Pump**: Open the drain plug or use a bucket to catch any remaining water in the pump housing. 3. **Remove the Pump**: Disconnect the electrical connections and unbolt the pump from its mounting. Carefully remove the pump from the system. 4. **Disassemble the Pump**: Remove the bolts or screws holding the pump casing together. Separate the casing to access the impeller and seal. 5. **Remove the Impeller**: Unscrew or unbolt the impeller from the shaft. This may require a special tool or holding the shaft in place to prevent it from turning. 6. **Extract the Old Seal or Gasket**: Carefully remove the old seal or gasket from the pump housing and shaft. Clean the surfaces thoroughly to remove any debris or residue. 7. **Install the New Seal or Gasket**: Place the new seal or gasket in the correct position. Ensure it is seated properly and aligned with the mating surfaces. 8. **Reassemble the Pump**: Reattach the impeller to the shaft, ensuring it is securely fastened. Reassemble the pump casing, making sure all bolts or screws are tightened evenly. 9. **Reinstall the Pump**: Position the pump back into the system, reconnect the electrical connections, and secure it to its mounting. 10. **Test for Leaks**: Open the valves and restore power to the pump. Check for any leaks around the seal or gasket area. Tighten connections if necessary. 11. **Final Check**: Monitor the pump operation to ensure it is functioning correctly and efficiently. Make any necessary adjustments.

How can I ensure compatibility of replacement parts with my existing pump model?

To ensure compatibility of replacement parts with your existing pump model, follow these steps: 1. **Identify the Pump Model**: Locate the model number and serial number on the pump's nameplate or manual. This information is crucial for finding compatible parts. 2. **Consult the Manufacturer**: Contact the pump manufacturer or visit their website to access parts lists or compatibility charts specific to your pump model. Manufacturers often provide detailed documentation and support for replacement parts. 3. **Use OEM Parts**: Opt for Original Equipment Manufacturer (OEM) parts whenever possible. These parts are designed specifically for your pump model, ensuring the best fit and performance. 4. **Check Specifications**: Compare the specifications of the replacement part with the original. Key specifications include dimensions, material, pressure ratings, and flow rates. Ensure they match or are within acceptable tolerances. 5. **Review the Manual**: Refer to the pump’s user manual or service guide for recommended replacement parts and maintenance procedures. Manuals often list part numbers and provide diagrams for easy identification. 6. **Consult a Professional**: If unsure, consult with a professional technician or engineer who specializes in pumps. They can provide expert advice on compatibility and installation. 7. **Use Online Resources**: Utilize online forums, databases, and communities where pump users and experts discuss parts compatibility and share experiences. 8. **Cross-reference Part Numbers**: If using third-party parts, cross-reference the part numbers with OEM parts to ensure compatibility. 9. **Consider the Application**: Ensure the replacement part is suitable for the specific application and operating conditions of your pump, such as temperature, chemical exposure, and duty cycle. 10. **Test the Part**: After installation, test the pump to ensure the replacement part functions correctly and does not cause any operational issues. By following these steps, you can effectively ensure that replacement parts are compatible with your existing pump model.

What maintenance tips can extend the lifespan of circulating pump components?

To extend the lifespan of circulating pump components, regular maintenance is crucial. Start with routine inspections to identify wear and tear early. Check for leaks, unusual noises, or vibrations, which can indicate underlying issues. Ensure the pump is properly lubricated to reduce friction and wear on moving parts. Use the correct type and amount of lubricant as specified by the manufacturer. Monitor the pump's operating conditions, including pressure and temperature, to ensure they remain within the recommended range. Overheating or excessive pressure can damage components. Regularly clean the pump and its components to prevent the buildup of debris and sediment, which can cause blockages and reduce efficiency. Inspect and replace seals and gaskets as needed to prevent leaks. Ensure that the pump is properly aligned and balanced to avoid excessive vibration, which can lead to premature wear. Check the electrical connections and motor condition to ensure efficient operation and prevent electrical failures. Regularly test the pump's performance to ensure it is operating at optimal efficiency. This includes checking flow rates and pressure levels. Implement a preventive maintenance schedule that includes all these checks and tasks to ensure consistent upkeep. Finally, ensure that the pump is installed correctly and that the system design supports its operation. This includes proper sizing and compatibility with the system's requirements. By following these maintenance tips, you can significantly extend the lifespan of circulating pump components, ensuring reliable and efficient operation.